图的定义
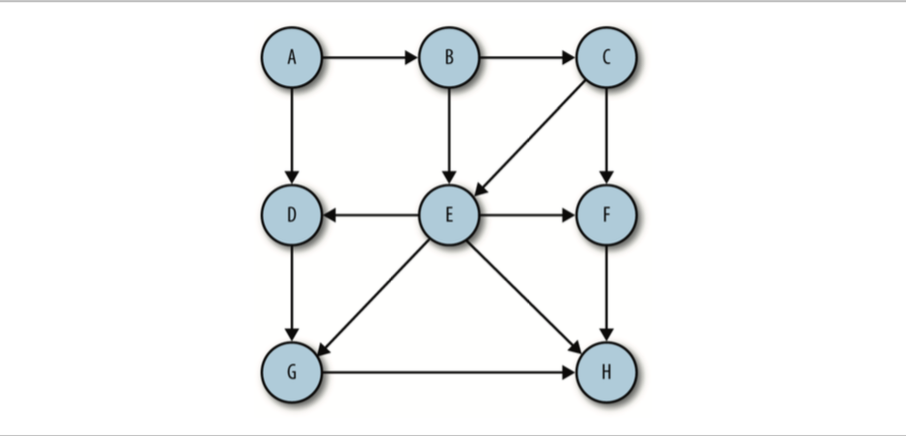
图由边的集合及顶点的集合组成。边由顶点 对 (v1,v2) 定义,v1 和 v2 分别是图中的两个顶点。顶点也有权重,也称为成本。如果一个 图的顶点对是有序的,则可以称之为有向图。在对有向图中的顶点对排序后,便可以在两 个顶点之间绘制一个箭头。有向图表明了顶点的流向。计算机程序中用来表明计算方向的 流程图就是一个有向图的例子。
有向图

无向图
如果图是无序的,则称之为无序图

构建图
图的实际信息都保存在边上面,因为它们描述了图的结构。我们将表示图的边的方法称为邻接表或者邻接表数组。这种方法将边存储为由顶点的相邻顶点列表构成的数组,并以此顶点作为索引。使用这种方案,当我们在程序中引用一个顶 点时,可以高效地访问与这个顶点相连的所有顶点的列表。比如,如果顶点 2 与顶点 0、 1、3、4 相连,并且它存储在数组中索引为 2 的位置,那么,访问这个元素,我们可以访 问到索引为 2 的位置处由顶点 0、1、3、4 组成的数组。

确定了如何在代码中表示图之后,构建一个表示图的类就很容易了。下面是第一个 Graph类的定义:
1 2 3 4 5 6 7 8 9 10 11 12 13 14 15 16 17 18 19 20 21 22 23 24 25 26
| function Graph(v) { this.vertices = v; this.edges = 0; this.adj = []; for (let i = 0; i < this.vertices; i++) { this.adj[i] = []; } this.addEdge = addEdge; this.showGraph = showGraph; } function addEdge(v, w) { this.adj[v].push(w); this.adj[w].push(v); this.edges++; } function showGraph() { for (let i = 0; i < this.vertices; i++) { let str = i + '->'; for (let j = 0; j < this.vertices; j++) { if (this.adj[i][j] !== undefined) { str += this.adj[i][j] + ' '; } } console.log(str); } }
|
测试代码:
1 2 3 4 5 6 7 8 9 10 11 12
| g = new Graph(5); g.addEdge(0,1); g.addEdge(0,2); g.addEdge(1,3); g.addEdge(2,4); g.showGraph(); ====输出=== 0->1 2 1->0 3 2->0 4 3->1 4->2
|
深度优先搜索
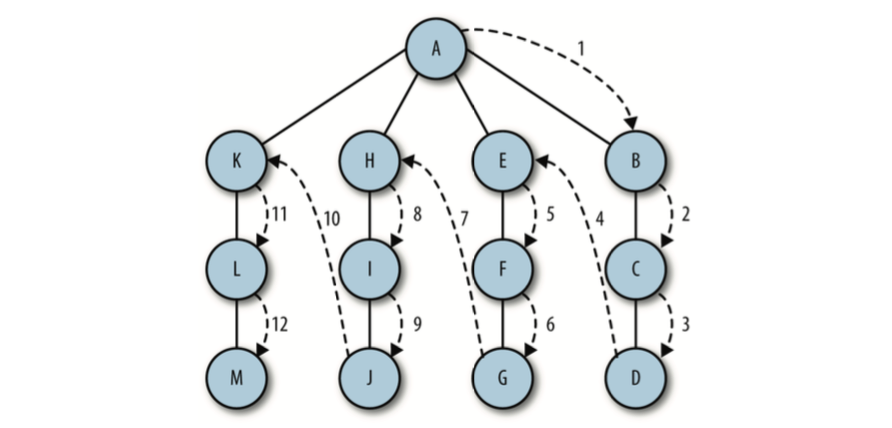
深度优先搜索包括从一条路径的起始顶点开始追溯,直到到达最后一个顶点,然后回溯, 继续追溯下一条路径,直到到达最后的顶点,如此往复,直到没有路径为止。这不是在搜 索特定的路径,而是通过搜索来查看在图中有哪些路径可以选择。

为Graph类添加一个数组,用来存储已访问过的顶点,将它所有元 素的值全部初始化为 false。
1 2 3 4
| this.marked = []; for (var i = 0; i < this.vertices; i++) { this.marked[i] = false; }
|
现在我们可以开始深度优先搜索函数:
1 2 3 4 5 6 7 8 9 10 11
| function dfs(v) { this.marked[v] = true; if (this.adj[v] !== undefined) { console.log('Visisted vertex: ' + v); } this.adj[v].forEach((w) => { if (!this.marked[w]) { this.dfs(w); } }) }
|
完整代码:
1 2 3 4 5 6 7 8 9 10 11 12 13 14 15 16 17 18 19 20 21 22 23 24 25 26 27 28 29 30 31 32 33 34 35 36 37 38 39 40
| function Graph(v) { this.vertices = v; this.edges = 0; this.adj = []; this.marked = []; for (let i = 0; i < this.vertices; i++) { this.adj[i] = []; this.marked[i] = false; } this.addEdge = addEdge; this.showGraph = showGraph; this.dfs = dfs; } function addEdge(v, w) { this.adj[v].push(w); this.adj[w].push(v); this.edges++; } function showGraph() { for (let i = 0; i < this.vertices; i++) { let str = i + '->'; for (let j = 0; j < this.vertices; j++) { if (this.adj[i][j] !== undefined) { str += this.adj[i][j] + ' '; } } console.log(str); } } function dfs(v) { this.marked[v] = true; if (this.adj[v] !== undefined) { console.log('Visisted vertex: ' + v); } this.adj[v].forEach((w) => { if (!this.marked[w]) { this.dfs(w); } }) }
|
测试代码:
1 2 3 4 5 6 7 8 9 10 11 12
| g = new Graph(5); g.addEdge(0,1); g.addEdge(0,2); g.addEdge(1,3); g.addEdge(2,4); g.dfs(0); ====输出=== Visited vertex: 0 Visited vertex: 1 Visited vertex: 3 Visited vertex: 2 Visited vertex: 4
|
广度优先搜索
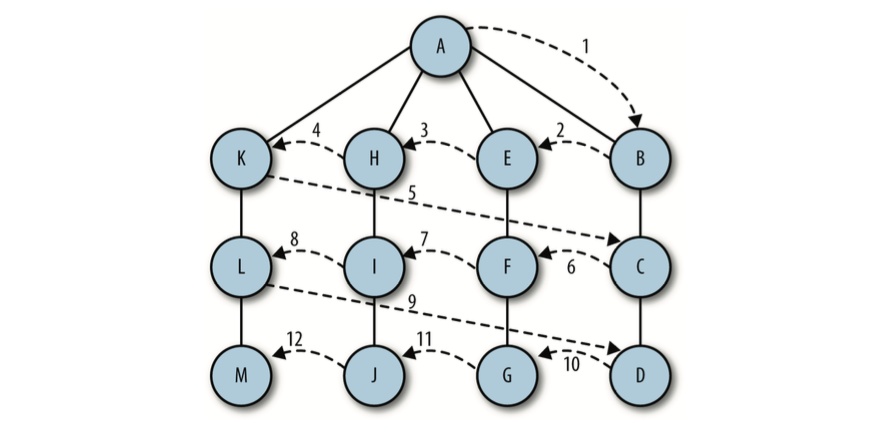
广度优先搜索从第一个顶点开始,尝试访问尽可能靠近它的顶点。本质上,这种搜索在图 上是逐层移动的,首先检查最靠近第一个顶点的层,再逐渐向下移动到离起始顶点最远的 层。

广度优先搜索算法使用了抽象的队列而不是数组来对已访问过的顶点进行排序。其算法的 工作原理如下:
- 查找与当前顶点相邻的未访问顶点,将其添加到已访问顶点列表及队列中;
- 从图中取出下一个顶点 v,添加到已访问的顶点列表;
- 将所有与 v 相邻的未访问顶点添加到队列。
1 2 3 4 5 6 7 8 9 10 11 12 13 14 15 16 17
| function bfs(s) { let queue = []; this.marked[s] = true; queue.push(s); while (queue.length > 0) { let v = queue.shift(); if (v !== undefined) { console.log("Visisted vertex: " + v); } this.adj[v].forEach((w) => { if (!this.marked[w]) { this.marked[w] = true; queue.push(w); } }) } }
|
测试下代码:
1 2 3 4 5 6 7 8 9 10 11 12
| g = new Graph(5); g.addEdge(0,1); g.addEdge(0,2); g.addEdge(1,3); g.addEdge(2,4); g.bfs(0); ====输出=== Visited vertex: 0 Visited vertex: 1 Visited vertex: 2 Visited vertex: 3 Visited vertex: 4
|
查找最短路径
在执行广度优先搜索时,会自动查找从一个顶点到另一个相连顶点的最短路径。例如,要 查找从顶点 A 到顶点 D 的最短路径,我们首先会查找从 A 到 D 是否有任何一条单边路径, 接着查找两条边的路径,以此类推。这正是广度优先搜索的搜索过程,因此我们可以轻松 地修改广度优先搜索算法,找出最短路径。
首先,需要一个数组来保存从一个顶点到下一个顶点的所有边。我们将这个数组命名为 edgeTo。因为从始至终使用的都是广度优先搜索函数,所以每次都会遇到一个没有标记的 顶点,除了对它进行标记外,还会从邻接列表中我们正在探索的那个顶点添加一条边到这 个顶点。
1 2 3 4 5 6 7 8 9 10 11 12 13 14 15 16 17 18 19 20 21 22
| this.edgeTo=[]; function bfs(s) { let queue = []; this.marked[s] = true; queue.push(s); while (queue.length > 0) { let v = queue.shift(); if (v !== undefined) { console.log("Visisted vertex: " + v); } this.adj[v].forEach((w) => { if (!this.marked[w]) { this.edgeTo[w] = v; this.marked[w] = true; queue.push(w); } }) } }
|
再添加pathTo函数,完整代码如下:
1 2 3 4 5 6 7 8 9 10 11 12 13 14 15 16 17 18 19 20 21 22 23 24 25 26 27 28 29 30 31 32 33 34 35 36 37 38 39 40 41 42 43 44 45 46 47 48 49 50 51 52 53 54 55 56 57 58 59 60 61 62 63 64 65 66 67 68 69 70 71 72 73 74 75 76 77 78 79 80 81 82 83 84 85 86 87 88 89 90 91 92
| function Graph(v) { this.vertices = v; this.edges = 0; this.adj = []; this.edgeTo = []; this.marked = []; for (let i = 0; i < this.vertices; i++) { this.adj[i] = []; this.marked[i] = false; } this.addEdge = addEdge; this.showGraph = showGraph; this.dfs = dfs; this.bfs = bfs; this.pathTo = pathTo; } function addEdge(v, w) { this.adj[v].push(w); this.adj[w].push(v); this.edges++; } function showGraph() { for (let i = 0; i < this.vertices; i++) { let str = i + '->'; for (let j = 0; j < this.vertices; j++) { if (this.adj[i][j] !== undefined) { str += this.adj[i][j] + ' '; } } console.log(str); } } function dfs(v) { this.marked[v] = true; if (this.adj[v] !== undefined) { console.log('Visisted vertex: ' + v); } this.adj[v].forEach((w) => { if (!this.marked[w]) { this.dfs(w); } }) } function bfs(s) { let queue = []; this.marked[s] = true; queue.push(s); while (queue.length > 0) { let v = queue.shift(); if (v !== undefined) { console.log("Visisted vertex: " + v); } this.adj[v].forEach((w) => { if (!this.marked[w]) { this.edgeTo[w] = v; this.marked[w] = true; queue.push(w); } }) } } function pathTo(t, v) { for (let i = 0; i < this.vertices; i++) { this.marked[i] = false; } this.bfs(t); let source = t; if (!this.marked[v]) { return undefined; } let path = []; for (let i = v; i != source; i = this.edgeTo[i]) { path.unshift(i); } path.unshift(source); let str = ''; for (let i in path) { if (i < path.length - 1) { str += path[i] + '->' } else { str += path[i]; } } console.log(str); return path; }
|
测试:
1 2 3 4 5 6 7 8 9 10 11 12 13 14 15 16 17 18 19 20 21 22
| g = new Graph(5); g.addEdge(0,1); g.addEdge(0,2); g.addEdge(1,3); g.addEdge(2,4); g.pathTo(0,4); ====输出=== Visited vertex: 0 Visited vertex: 1 Visited vertex: 2 Visited vertex: 3 Visited vertex: 4 0->2->4 g.pathTo(1,4); ====输出=== Visited vertex: 1 Visited vertex: 0 Visited vertex: 3 Visited vertex: 2 Visited vertex: 4 1->0->2->4
|
拓扑排序
拓扑排序会对有向图的所有顶点进行排序,使有向边从前面的顶点指向后面的顶点。
拓扑排序算法与BFS类似,不同的是,拓扑排序算法不会立即输出已访问的顶点,而是访问当前顶点邻接表中的所有相邻顶点,直到这个列表穷尽时,才会将当前顶点压入栈中。拓扑排序算法被拆分为两个函数,第一个函数是topSort(),用来设置排序进程并调用一个辅助函数topSortHelper(),然后显示排序好的顶点列表
1 2 3 4 5 6 7 8 9 10 11 12 13 14 15 16 17 18 19 20 21 22 23 24 25
| function topSort() { let stack = []; let visited = []; for (let i = 0; i < this.vertices; i++) { visited[i] = false; } for (let i = 0; i < this.vertices; i++) { if (visited[i] == false) { this.topSortHelper(i, visited, stack); } } for (let i = stack.length - 1; i >= 0; i--) { console.log(this.vertexList[stack[i]]) } } function topSortHelper(v, visited, stack) { visited[v] = true; this.adj[v].forEach((w) => { if (!visited[w]) { this.topSortHelper(w, visited, stack) } }) stack.push(v) }
|
测试:
1 2 3 4 5 6 7 8 9 10 11 12 13 14 15 16 17 18 19
| g = new Graph(6); g.addEdge(1,2); g.addEdge(2,5); g.addEdge(1,3); g.addEdge(1,4); g.addEdge(0, 1); g.vertexList = ["CS1", "CS2", "Data Structures", "Assembly Language", "Operating Systems", "Algorithms"]; g.topSort(); ====输出==== CS1 CS2 Operating Systems Assembly Language Data Structures Algorithms
|
完整代码https://github.com/caolinjian/javascript-data_structures-algorithm/blob/master/Graph.js
参考资料:《数据结构与算法JavaScript描述》


